Installing Our Well Pump & Fresh Water System
Though we had our well drilled professionally, we opted to purchase and install our own well pump. We ordered our submersible well pump and all of the materials for installation from Northern Arizona Wind and Sun. Installing our own fresh water well pump was one of the most exciting projects that we have undertaken. And all in all it was not too terribly complicated.
Well Pump Equipment & Materials List
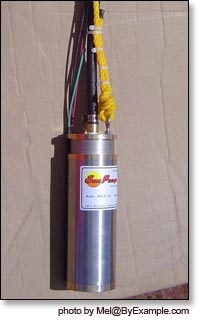
Sun Pumps Submersible Pump, Model SDS-D-128
Sun Pumps Pump Controller, Model PCA 30-M1D
ShurFlo Pressure Pump, Model 2088-573-534
200 Ft. 8 Gauge Submersible 2 Wire with Ground
200 Ft. 3/8" Safety Rope
Water Proof Splice Kit
Hooking Up the Submersible Well Pump
The first step in hooking up the well pump was to unroll and line up the 1/2" poly pipe, the 8 gauge submersible wire, and the 3/8" safety rope. Once each of the 200 foot lengths was laid out we bundled the lines together, securing them to one another with plastic zip ties at 10 foot intervals. Though the poly pipe was somewhat rigid, fortunately we managed to stage it for installation without putting any kinks in it.
Next, Patrick connected the pipe, the wire and the rope to our Sun Pumps submersible pump. The poly pipe is connected onto the top of the pump with a pipe clamp and the safety rope is fastened at the designated point with a series of knots reinforced with plastic ties. I watched as Patrick wired the pump to the power source and it looked like a fairly straightforward process. He used parts supplied in the water proof splice kit to connect the wires on the pump to the 200 feet of submersible wire. The kit supplied shrink wrap tubing which we used to create a water tight seal around the spiced wires.
Once the pipe, rope and wire were securely fastened to the pump we were ready to lower it into the well.
Lowering the Submersible Pump
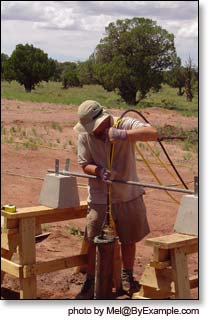
First, we measured the distance between the ground and the static water level by lowering a rope into the well. When we pulled it up, we measured the length of the dry rope to determine the level of the water. Using this measurement in conjunction with the manufacturer's recommendations we calculated the appropriate depth to lower our submersible pump into the well.
We created a rig using a pair of saw horses, concrete foundation blocks and a steel pipe to assist us in lowering the pump. To ensure that we didn't lose our pump during installation, we secured the loose end of the safety rope to a nearby tree. Then Patrick carefully guided our submersible pump into the well opening, feeding the cords down the hole until it reached a depth of 140 feet. According to our calculations we've situated our submersible pump 29 feet below the static water level.
The next step was to permanently secure the safety rope and to recap the well opening.
Utility Shed
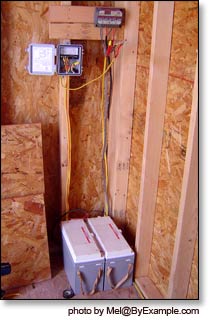
After we lowered the pump into the well, we made final preparations for powering it with solar. We constructed a small utility shed near the well head to house our solar power systems and our water distribution system, as well as our phone and data equipment. Our goal was to locate all of our utility equipment in a compact area to minimize the amount of wire and pipe needed and to have a central location to simplify systems management.
Solar Powered Well Pump
The well's power system consists of two solar panels, two sealed batteries, a charge controller and the Sun Pumps pump controller. Initially we set it up as a stand alone 24 volt system. To pump water we simply flip a switch on the pump controller that activates the submersible pump.
2 Kyocera 125W 12V Solar Panels
Morningstar Prostar 30A 12/24V Charge Controller
Fresh Water Distribution System
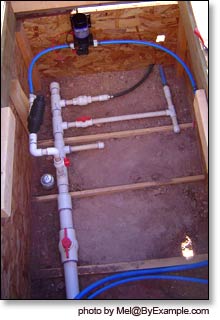
The water that is piped from our well is carried into a water manifold that is located in a pit beneath our utility shed. It is the central point of our water system that connects the well pump, storage tank, pressure tank, pressure pump, and all of the fresh water lines out. We can access the manifold and water distribution equipment through a trap door in the floor of the utility shed.
Water Storage Tank
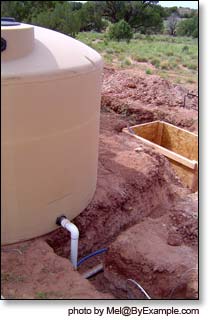
Once the solar power system was in place and the water distribution equipment installed we were ready to hook into our fresh water storage tank. After situating the 1600 gallon storage tank we ran PVC lines from the water manifold to the base of the tank. We configured the opening near the base of the storage tank for fresh water intake, while the opening at the top is an overflow outlet. A drainage line carries overflow water to spot several yards away.
Our water storage tank came in a light tan color which blended nicely with the surrounding environment. However we noticed that its lighter color allowed a lot of sunlight to penetrate the walls of the storage tank. To prevent any chance of unwanted bacterial growth in our tank, we painted the outside with exterior house paint. It is still a lovely tan color, but the paint prevents nearly all light from shining into the tank.
We purchased a float switch, which we plan to install in the water tank once we've had a chance to observe the performance of our initial water system. The float switch is designed to automatically shut down pumping when the tank reaches the desired level.
Fresh Water Pex Lines
Earlier during the summer we ran fresh water lines to various points on the property that all connect back to the water manifold. In lieu of PVC pipes we used Pex tubing for both our cold and hot water lines. We are really pleased with the new system, as Pex lines are connected via a crimping method rather than with a glue.
Running Water on Our Homestead!
The fresh water lines are buried at a depth of 24 inches and at several spots on the property we installed farm faucets. When all was finally set for go, we began pumping water into the storage tank and then tested each of our new faucets. Everything worked like a charm and we now have fresh running water on our property! It is really a pretty cool feeling.
Photo Gallery
Installing Water, Phone & Data Lines
Installing Our Solar Powered Well Pump & Storage Tank
Running Lines to Our Septic System
Well & Fresh Water Storage Books
 |
Wells and Septic SystemsMax & Charlotte Alth. McGraw Hill, New York, 1992.
This book provides information for homebuilders who want to install their own septic system or well. The authors discuss several methods for digging your own well, as well as materials and equipment that you will need. It covers the basics on perc testing and overviews the process of putting in a septic system in from start to finish. Click here to buy this book >> |
To choose from a greater selection of books visit the ByExample.com Bookstore. We offer a variety of how to books on topics related to off-grid living, homesteading and sustainability.